Fix Sinking Interlock Bricks on Driveway
Interlock Driveways, Hardscaping Richmond Hill, Interlock Repair Ontario
How to Fix Sinking Interlock Bricks on a Driveway
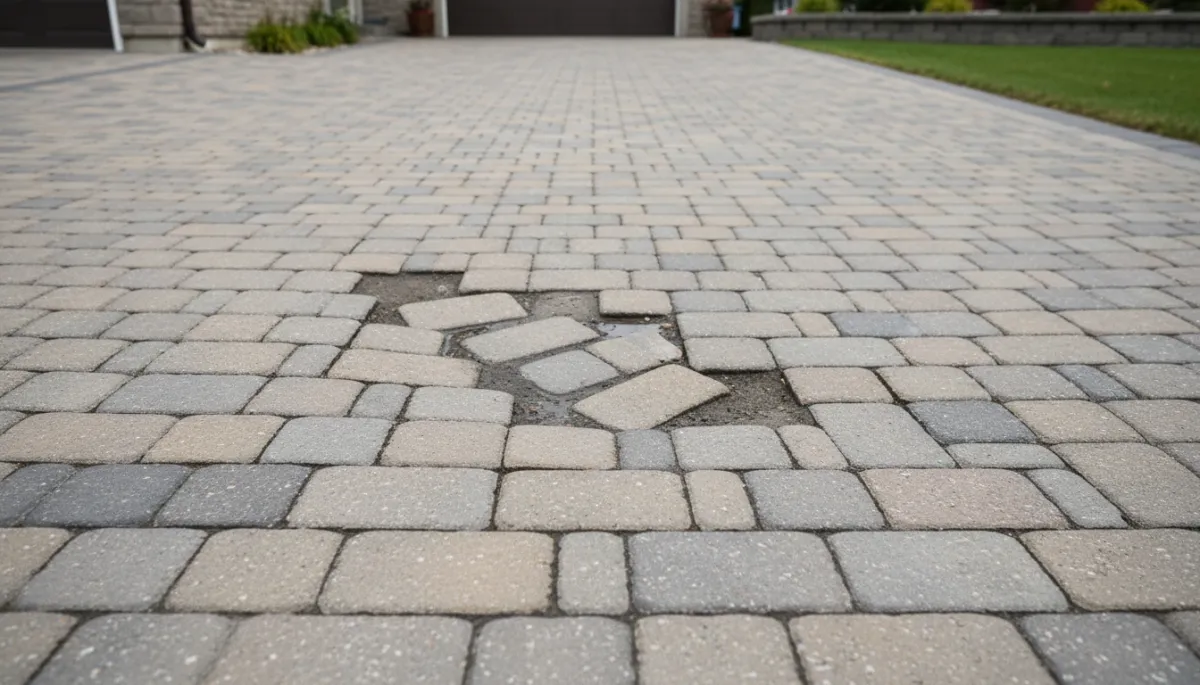
A sinking or uneven interlock driveway doesn’t just look bad—it can create tripping hazards, drainage problems, and long-term damage to your property. In the Greater Toronto Area, where freeze–thaw cycles and heavy vehicle use are part of daily life, interlock issues are especially common. This guide from Lush Lawncare & Landscaping in Richmond Hill walks you through why interlock bricks sink, how to tackle minor repairs yourself, and when it’s time to call a professional hardscaping team.
Why Interlock Bricks Sink on Ontario Driveways
Understanding what caused the problem is the first step to a lasting fix. In the GTA, several factors commonly lead to sinking, shifting, or uneven pavers.
1. Freeze–Thaw Cycles in Ontario
Our climate in Richmond Hill and across Southern Ontario is tough on hardscaping. Moisture seeps into the base and bedding layers under your interlock. When temperatures drop, that water freezes and expands, pushing pavers up. When it thaws, the base can settle unevenly. Over many winters, this cycle leads to dips, humps, and wavy tire tracks down the driveway.
2. Poor Base Preparation During Installation
A long-lasting interlock driveway starts with a properly excavated and compacted base. If the original installer cut corners—using too little gravel, skipping compaction, or using the wrong materials—the base will settle over time. The result is localized sinking where the base is weakest, often in the wheel paths or near the garage door.
3. Water Drainage Problems
Water should run off your driveway and away from your home. If the driveway slopes the wrong way, downspouts discharge onto the pavers, or there’s no clear drainage path, water can pool and soak into the base. Over time, this washes out the bedding sand and weakens the gravel base, leading to sinking and spreading joints. Drainage is a major factor in interlock repair Ontario projects we see every season.
4. Heavy Vehicle Loads and Overuse
Interlock driveways are usually designed for standard cars and light trucks. Parking work vans, delivery trucks, RVs, or repeated snowplow traffic on a residential driveway can overstress the base. This is especially true if the base was not built to a sufficient depth. The added load compresses the base unevenly, creating ruts and depressions over time.
5. Tree Roots and Soil Movement
Mature trees near the driveway can slowly push up sections of interlock as roots grow. In other areas, roots draw out moisture and cause the surrounding soil to shrink and settle. Combined with natural soil movement and compaction over time, this can create uneven surfaces, gaps, and low spots that collect water.
Signs It’s Time to Fix Your Interlock Driveway
Not every small imperfection requires a full rebuild, but ignoring early warning signs can lead to more expensive repairs later. Watch for:
- Visible dips or depressions where water pools after rain or snowmelt
- Uneven or rocking pavers that move underfoot or under your vehicle’s tires
- Gaps between bricks where joint sand has washed out or ants have tunneled through
- Settling along the garage door or walkway transitions, creating trip edges or spots where water flows toward the house
- Heaving or raised areas near trees or along the edges of the driveway
If you see one or two small low spots, a careful DIY repair can often solve the issue. If the whole driveway looks wavy or you notice water flowing toward your foundation, it’s time to talk to a hardscaping Richmond Hill specialist like Lush Lawncare & Landscaping.
DIY Repair: How to Fix Minor Sinking Interlock Bricks
For localized sinking—say, a small depression where a tire usually sits—you can often perform a temporary repair yourself. Here’s a practical, step-by-step process many GTA homeowners can handle with basic tools.
Step 1: Mark and Lift the Affected Pavers
- Use chalk or tape to outline the sunken area, extending at least one full brick beyond the visible dip on all sides. This gives you room to blend the repair into the surrounding surface.
- Carefully pry up the pavers using a flat screwdriver or paver puller. Start at an edge or joint, working slowly to avoid chipping the bricks. Stack them neatly in the same pattern so you can relay them correctly.
Step 2: Inspect and Regrade the Base and Sand
- Remove any loose bedding sand and debris until you reach a firm, compacted surface. If the gravel base looks muddy, soft, or inconsistent, that’s a sign of deeper base failure—DIY may not be enough.
- Add fresh bedding sand (concrete sand, not play sand) and screed it level using a straight board. Aim for a smooth, even layer about 1 inch thick, matching the height of the surrounding untouched area.
Step 3: Relay the Bricks in the Original Pattern
- Place the pavers back onto the leveled sand, following the original laying pattern. Keep joints tight and consistent, tapping each brick gently into place with a rubber mallet.
- Use a straight edge across the repaired area to ensure the pavers sit flush with the surrounding driveway. Adjust the sand level as needed before final tamping.
Step 4: Compact and Re-Sand the Joints
- For small areas, hand tamping with a rubber mallet may be enough. For larger patches, renting a plate compactor will give better results and help lock the pavers into the bedding layer.
- Sweep jointing sand (or polymeric sand, if compatible with your driveway) into all the joints. Compact again, then top up the joints until they are fully filled. This step helps stabilize the surface and reduce weed growth.
When DIY Isn’t Enough: Signs of Major Base Failure
A quick DIY approach can improve appearance temporarily, but it won’t solve serious structural issues. Consider professional interlock repair Ontario services if you notice:
- Widespread settling across large sections of the driveway, not just one or two spots
- Persistent drainage problems, such as water running toward the house or pooling in multiple areas after every storm
- Soft, spongy base material when you remove pavers, indicating washed-out or contaminated gravel
- Repeated sinking in the same areas even after DIY leveling and re-sanding
In these cases, simply adding more sand is like putting a bandage on a structural problem. A professional hardscaping contractor in Richmond Hill can assess the root cause and recommend a more permanent solution.
What Professional Hardscaping Repair Involves
At Lush Lawncare & Landscaping, a typical driveway restoration goes well beyond surface-level fixes. Our goal is to rebuild the structure so your interlock stays level and attractive for years, even through Ontario’s harsh winters.
1. Careful Excavation and Removal
We start by lifting and setting aside the existing pavers (reusing them when possible to save costs). Then we excavate down to the required depth, removing failed base material, organic soil, and any debris that could compromise the new foundation.
2. Installing a Proper Gravel Base
A strong base is the key to preventing future sinking. We install layers of high-quality, well-graded gravel (often referred to as “3/4" crush” or similar) to the correct depth for driveway loads. Each layer is compacted thoroughly using professional equipment to create a stable, frost-resistant foundation.
3. Proper Bedding Sand and Slope
Over the compacted base, we install a consistent layer of bedding sand and screed it to an even thickness. At this stage, we also fine-tune the slope of the driveway, ensuring water drains away from your home, garage, and walkways. Correct drainage is one of the most important long-term protections against sinking and heaving.
4. Relaying, Compacting, and Joint Stabilization
Finally, we relay the interlock bricks in the desired pattern, compact them into the bedding sand, and fill the joints with the appropriate sand or polymeric product. This professional process restores the look of your driveway and significantly improves its structural integrity compared to a simple DIY patch.
Preventing Sinking in the Future
Once your driveway is level again, a few smart habits will help keep it that way and protect your investment.
- Maintain proper drainage: Keep downspouts, gutters, and nearby grading directing water away from the driveway. Consider adding drainage channels or catch basins if pooling persists.
- Avoid overloading: Minimize parking of heavy trucks, trailers, or equipment on residential interlock driveways unless they were specifically engineered for those loads.
- Top up joint sand regularly: Refill joints every couple of years, or as needed, to keep pavers locked in place and reduce water penetration and weed growth.
- Consider sealing: A quality sealer, applied by a professional, can help protect against staining, reduce water absorption, and make snow removal easier. While sealing won’t fix structural issues, it can extend the life of a properly built driveway.
Cost: Repair vs. Full Replacement in Ontario
Budget is always an important consideration when deciding how to fix sinking interlock bricks driveway surfaces. While exact pricing depends on site conditions, size, and materials, there are some general guidelines for GTA homeowners.
- Targeted professional repairs: Lifting and relaying specific sections with proper base correction is typically more affordable than a full replacement. This option is ideal when 70–80% of the driveway is still structurally sound.
- Full driveway rebuild: If the base has failed across most of the area, rebuilding from the ground up may be more cost-effective in the long run. You’ll get a fresh, properly engineered base designed for Ontario conditions, which can reduce maintenance and repair costs over the next decade or more.
A trustworthy contractor will walk you through both options, explain the pros and cons, and provide clear, written estimates. At Lush Lawncare & Landscaping, we’re happy to inspect your driveway, explain what’s happening under the surface, and recommend the most practical solution for your home and budget.
Get Expert Help with Interlock Repair in Richmond Hill and the GTA
If your driveway is starting to sink, ripple, or collect water, you don’t have to live with it—or guess at the right fix. As a local hardscaping specialist based in Richmond Hill, Lush Lawncare & Landscaping understands GTA soils, weather, and building standards. Our team combines practical experience with proven construction methods to deliver interlock repairs that last.
Whether you need a small section lifted and releveled or a full base reconstruction, we can help you restore both the safety and curb appeal of your property. Explore our full range of hardscaping services or learn more about our company on the Lush Lawncare & Landscaping homepage.
Ready to see what’s really going on beneath your interlock? Contact Lush Lawncare & Landscaping today to schedule a free hardscaping assessment in Richmond Hill or the surrounding GTA. We’ll inspect your driveway, explain your options in clear language, and provide a no-pressure quote so you can make a confident, informed decision.